The Dolphin Club has a unique fleet of historic rowing boats. They are all hand-made and lovingly maintained at our club-house. It’s a special privilege that is hard to find anywhere else in the world.
Before using the traditional wooden boats, you are required to take an orientation. These are typically held monthly. Please add your name to the waitlist by filling out the Request Training Form
The Fleet
The design of many of our boats is the Dolphin Club Single – this design is a variant of the traditional Whitehall which was once a common sight along historic waterfronts. They’re good for moving people, cargo, and pleasure boating. The design was, and still is, treasured for its seaworthiness, carrying capacity and good looks.
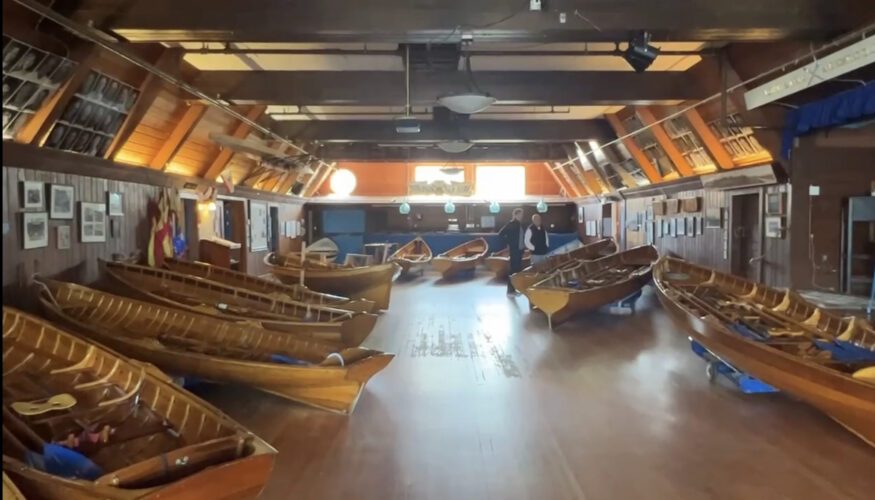
The club has 9 DC singles, built mostly of Port Orford cedar and oak, that will be available for you to row once you’ve completed the orientation: Cecco, Bruno, Baggiani, Foster, Landucci, Wanderer, Kupuna, Semper Fi, and Commodore are mostly the same design.
Good Luck is a slightly different design with lower gunwales than the others.
In addition to the wooden lapstrake boats, there is Austin (a fiberglass whitehall), Ring (a plywood dory), and two plastic Whitehall Spirit® Solo 14s® (Hubbard and Mary Magocsy)
Preparation
- Check currents and winds and plan your row before doing anything else.
- Inspect your Boat. Check the condition and readiness of your boat, oars and equipment.
- Sign boat out in the Log.
- Bring a life vest aka “Personal Flotation Device” (PFD) and a signaling device such as a whistle or airhorn.
- Lubricate the oarlocks, the outboard side of the oar sleeves and oar buttons. Check the sliding seats and lubricate each seat wheel retainer with a drop of oil.
- Prepare the boat for launch. Move both oars to the far side of the boat (away from where you will board). Clear away any equipment to open a clear path into the boat.
Launching & Recovery
- Wheel the boat down to the end of the dock, and stop before the apron.
- It helps to wet down the slipway on the apron to make it easier to slide the boat. There’s a bucket for this on the right.
- Use the blue chock to block the wheels of the boat dolly.
- Raise the bow of the boat until the keel touches the apron then carefully slide the boat off the dolly, and down towards the end of the apron.
- If the ramp angle is steep, you may want to raise the ramp first to make it easier to control the boat. Push the boat to the end, tie-off the boat with a cleat hitch before lowering the dock.
- When operating the apron make sure that the cables attached to the apron are taut (when the tide is rising) or have no more than a foot of slack (when the tide is dropping). Too much slack can cause the cable to overlap when raising the apron. This will result in the apron being higher on one side than on the other.
- Place dolly upside down on the side of the pier
- With the boat against the apron double up the bow line and pass it through the rope ring. Double the line again and board the boat.
- Get in the boat.
- Place oars in the oarlocks.
- Check for swimmers or other boats and shove off carefully.
Returning from your row, slowly approach the end of the ramp with your bow into the direction of the current and/or wind. Arriving into the wind and current allows you to come in slowly and control your forward progress. If the wind or current are pushing you into the dock you can soon find yourself moving too quickly and unable to stop.
- Stop a short distance out to look for other boats and swimmers
- Place both oars inside the boat on the side away from the dock. Clear a path for exiting the boat.
- Keep a hold of the bowline as you exit the boat.
- Pull the boat, from the bow, onto the ramp.
- Secure the bowline to a cleat to keep the boat from sliding back into the water.
- Raise the ramp level with the pier
- Go retrieve your boat’s dolly and place the blue wheel chock behind the wheels to block the dolly from rolling back on to the pier.
- Raise the apron to use gravity to your advantage, then pull the boat up onto the dolly. This is easier with help. Don’t be shy to ask for help from others on the dock.
- When the boat is correctly balanced on the dolly, you should be able to press the bow of the boat down to the dock with your thumb. When you release it, the bow should rise up and the stern return to the dock. Some dollies have an oarlock indicator: position the boat’s oarlocks inline with the indicator.
- Look for signs that other Dolphins are still out rowing (dollies for wooden boats and coastals or slings for shells). If others are still out, lower the ramp back to the water, otherwise leave the apron in the up-position and turn off the control box.
On the Water
Once you’re on the water, you’ll use standard rowing technique. More about this in the How to Row section of this guide.
Putting the Boat Away
- Return your PFD (Life Vest) to the rack
- Wipe lubricant off the oarlocks and oars (paper towel just inside kitchen door)
- Fully wipe down and dry the boat and oars. Clean rags can be found in locker B on the right side as you enter the Boat Shop. Remove the burden boards and dry and be sure to dry the lowest part of the keel where water tends to pool. Wet rags can be hung back up behind the long bar in the boathouse.
- Do not lean the oars against a wall while you wipe down the boat. A gust of wind could knock them down and shatter the oar blades. Avoid resting an oar on its blade too.
- Do not hose down the wooden boats with fresh water. There should be NO water, or salt stains in the boat.
- After the boat is dry, place the oars back inside the boat, one on each side of the seat, with the blades in the stern and facing up. Coil the bow and stern lines
- Wheel the boat back carefully, pushing her from the stern with the bow facing the club house. Place the boat into an open spot in the boathouse.
- Log the boat in by completing your entry in the Rowing logbook. Note any damage or maintenance issues in the log (and notify the boat captain)
Parts of the Boat
The Dolphin Club wooden boats, with two exceptions, are all equipped with a “sliding seat”. The moving seat was a 19th century innovation for racing and pleasure rowing that increases stroke length and distance per stroke.
Here are some of the other parts of the boat that are important to know.
- Bow and Stern: the bow is the front of the boat and the rear part is the stern.
- Keel: The strong structural element at the lowest point on the hull, running the length of the boat. On Dolphin wooden boats the keel is protected with a brass strip.
- Gunwale: (Pronounced “Gun’l”) The upper edge of the boat’s sides.
- Transom: The flat planking across the stern. On a Whitehall boat the transom has a distinctive “wineglass” shape.
- Burden Boards: The flooring boards laid in the bottom of the boat. These boards are designed to bear the weight of the rower. Do not step on the outer planking, or you might damage the boat. You should only put your weight on burden boards, thwarts, and seats.
- Thwarts: The transverse or crossways bracing of the boat.
- Foot Stretcher: A specific thwart that includes foot braces and straps.
- Oarlocks: Fittings that hold the oars when rowing, are the pivot that allows them to swing, and transfer the rower’s power to the boat. The oarlock is set in place with a “pin” inserted into a hole in the gunwale.
- Button and Sleeve: The button is a flat plate on the oar that sits against the oarlock when the oar is in place. Place the button on the inside of the oarlock to prevent the oar from sliding outwards The sleeve protects the oar from damage by the oarlock.
- Bilge Guards: Also called bilge stringers, these are wooden strips running along the boat about 1/3 of the way from the keel towards the gunwale (upper edge). When the boat is sitting off of the dolly, it can be leaned over to rest on the bilge guard. Do not allow the boat to slam down onto these guards when it is sitting on its keel. Let the boat lean over slowly and carefully.
- Lines: Ropes used in boats are referred to as ‘lines’. – The rowing boats have bow and stern lines.
